

Building an Aquarium Cabinet
I had two different ideas, one a box frame stand made from 2x2 wood, and one a cabinet made from chipboard. Both designs are shown here. In the end, I combined the two designs - a frame for strength, boxed in with chipboard to brace the structure and to turn it into a cabinet. I added some old brackets and a board offcut inside for a shelf, and to my surprise I had a strong cabinet which looks acceptable and is holding the tank well!
Here is a guide to how it was made, in photos. The cost was £19 for the pine 2x2, £16 for the chipboard, and £15 for paint, hinges, magnetic catches and doorhandles.
I needed the following equipment, most of which I already had: wood glue, electric drill/screwdriver, chisel, mallet, g-cramps, wood saw, junior hacksaw, sander, various drill bits including countersink bit and various screws. Other jobs were made easier by using a tenon/box saw (for very precise cuts) and circular saw (quicker!) but these were not essential. I also took care to use eye protection and dust mask where necessary.
It took me ten days to build, working for a few hours a day. I also managed to do most of it sitting down, which was important as I have mobility problems and can't stand for too long.
 First you need to throw the cat out of the room! |
 I tried sawing my 2x2 with a tenon boxed saw, which gave very precise cuts, but a circular saw was quicker. |
 Here are all the pieces of wood cut to shape, and checked for length against the tank they will be holding. |
 A lap joint was cut into each end, chiselled to the exact size, and sanded smooth. |
 The frame is laid out ready for gluing. |
 Here are two ends ready to be glued, with the glue applied liberally. As my wood did not line up perfectly, I ended up having to glue both sides, but only one is recommended. The joint was held with a G-cramp for the first few hours while drying. |
 The completed frames for the top and bottom of the structure. Cat has snuck back in to inspect handiwork. |
 Having made the frames, I drilled and screwed the legs on using long decking screws. |
 The legs were a little wobbly until joined at both top and bottom! |
 Finally the structure is complete. It was fairly solid too, until I tested it by lying on it. After that it had a strange wobble. |
 Outside, painting the frame and the top, side and door boards so they are waterproof. |
 The top and bottom are laid in place - the bottom is actually inside the cabinet to make a floor for my equipment. When fitting the top, ensure it is flat all over with a spirit level. |
 Screws to attach the boards are countersunk, so a hole like this is made with a countersink drill bit... |
 ...and then the screws fit flush with the wood, important when there will be a glass structure on top of it. |
 The back board needs large notches cut on both sides using wood saw and chisel. |
 One notch is for the filter pipes, the other for the electric cables. |
 The cabinet now has top, bottom and back attached. I used an offcut to make a shelf. The structure was now rock solid, to my relief! |
 Looking inside the cabinet now the sides are on. You can see the brackets for the shelf. |
 The completed cabinet now with doors fitted with hinges, magnetic catches and seahorse shaped handles. A proud moment! |
 Inside you can see plenty of room for the necessary equipment, food and so on. |
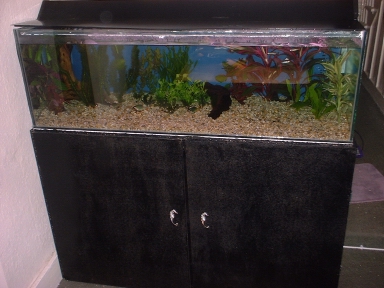 The finished cabinet, with the tank set up. Looks fabulous, and does the job! | |
- Pilot holes drilled too big so bracket screws were held in place by wood glue
- Pilot holes drilled too small so drill bit broke off in cabinet
- Screws for hinges too long for door - had to hacksaw the ends off, file and paint over them
- Screws for magnetic catch too long for door - instead I used superglue
- Paint ran out part way through only to find it is discontinued and I had to mix and match with something else
- Back was put on upside down so the notches are lower than planned
- Shelf was kept on cupboard floor below brackets while I worked on other bits. Once the sides were on, it was too tight to slide the shelf back into place and the sides had to come off again!
Back to Fish Index
Vote for this site at Aquarank!
This page last updated: 01 September 2022

If you have a comment, please leave it in the guestbook. To contact Flash directly, complete this form. Like this site? Buy me a drink!
This site moved from a fixed width to the current layout in 2009. Some older content such as photo sets may still have a fixed width. However if you notice any pages which are actually broken, please be kind enough to let me know via this form.
© Flash Wilson 1999-2010. I charge a fee for use of my photos.